
How to take screenshots with Mac: mini complete guide

Our tutorials on how to capture screenshots on various devices continue; today we will focus on how to take screenshots with Mac.
Macs, like Apple’s mobile devices, are unique in their own way.
They have their own unique operating system and numerous applications that you can only find and use if you own an Apple branded smartphone or computer.
Beloved for some and hated for others, they have nonetheless become part of our lives.
In our previous articles we told you how to take a screenshot with a Samsung A12, with a Pc and with an Iphone12.
Now it’s our turn to find out how to take a screenshot with a Mac.
There are several ways to get the screenshot on the Mac: from the keyboard, with a key combination, and even using an app. You can also use a timer, as if it were a camera. Read on to learn about the different methods and choose your favorite.
First method for taking screenshots with Mac
For the first system of capturing with Mac you will have to use the program called “Grab”. This method is perhaps the least intuitive however effective and performs the capture function almost flawlessly.
But let’s see how to proceed.
First you need to go to “Applications – Utilities – Grab“.
At the top left of your monitor you need to select the “Capture” item.
Then a drop-down sub-menu will open and 4 screenshot modes will appear for you.
The first is “Selection” where you can capture a specific area by simply dragging it with your mouse.
The second is “Window” which allows you to capture a window of an application that you have clicked on with the mouse.
The third item is “Screenshot” where you can capture the entire contents of the screen.
Fourth and last mode is “Timed Screen“.
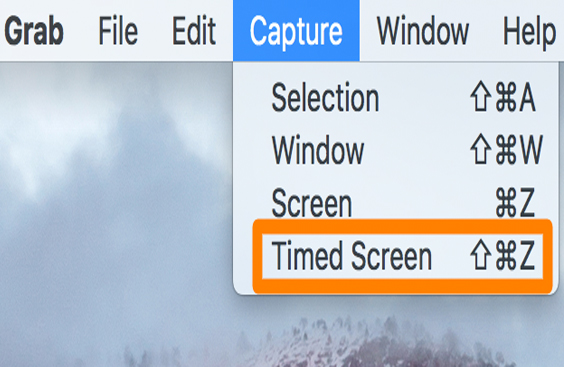
In this case you have 10 seconds to choose what to screenshot, after which the screen will be captured completely.
Second capture method for Mac.
In this case you have to press a series of keys at the same time, and this combination allows you to capture the specific window you selected.
The keys to press are as follows: “Command – Shift – 4” simultaneously followed immediately by the space bar.
If you have pressed all the indicated keys correctly you will see the mouse cursor change from the classic arrow to a small camera.
Now all you have to do is move the cursor to the window you want a screenshot taken and press the spacebar again.
By doing so the entire window will be captured and saved on your Mac.
Third method for taking screenshots with Mac.
Do you need to capture a portion of the screen without having to go and retouch an entire screenshot?
No problem, with this system you can take a screenshot of any portion you want.
Again, all you have to do is press the keys on your keyboard “Command – Shift – 4” at the same time.
This command looks similar to the previous one but be careful, compared to the method before you do not have to press the space bar.
Press the keys just described and you will see the cursor change to a double arrow.

Now, all you have to do is click the mouse and drag it, selecting the area you are interested in.
Once you go to release the mouse a screenshot of the portion of the screen you just selected will be taken and saved to your desktop.
We’ll let you in on a little trick…
If you find that you have selected a part of the screen that you don’t actually care about, or you just want to cancel the capture operation, by pressing the “Esc” key you can adjust or cancel it.
Fourth method of taking a screenshot with Mac.
This method is very similar to the one just described, differing only in one small detail.
You can indeed capture a specific part of your screen by pressing the “Command – Shift – Control – 3” keys, but the screenshot instead of being saved on the desktop will go to the clipboard.
The screenshot you just took can then be edited and pasted wherever you see fit.
Fifth method for taking screenshots with Mac
The last method of taking a screenshot with Mc is clearly the simplest and the most widely used.
We are talking about capturing the entire screen of your Mac.
In this way you have the opportunity to take everything you see on the screen.
To do this you have to press “Command – Shift – 3” and that’s it.
The only caution you must have is to be sure that everything on your monitor is actually what you want to screenshot.
We will never cease to say that taking a screenshot is an overly underrated practice.
At Made Web Solutions, first and foremost we wanted to be helpful to you by explaining how to take a screenshot with different devices, but more importantly we wanted to give value to a technique that can really simplify things for you instantly and avoid wasting time.
If you have any clarifications on this matter or would like to learn more, please do not hesitate to contact us.